Getting Started
To get started, use the File->Open menu, and load the
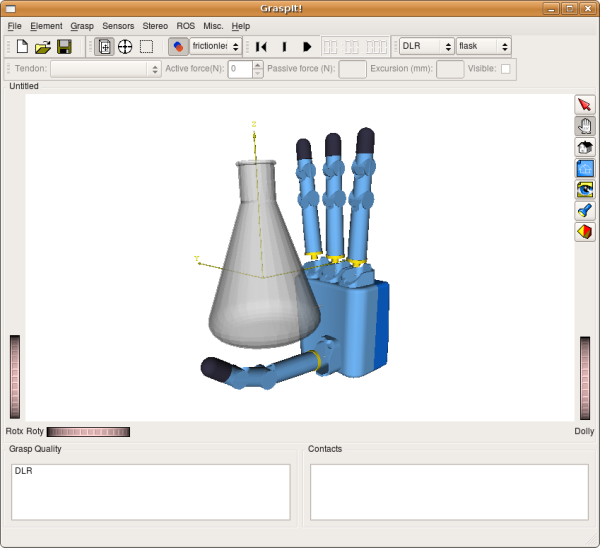
simulation world file dlr_flask.wld. Note that by default GraspIt!
will look for world files in $GRASPIT/worlds. This is a very simple
simulation world containing nothing except a hand (the DLR model) and an
object (a flask).
In general, you can also start with an empty simulation world and populate it by importing robots and objects, one at a time, using the Import options in the File menu. You can then save a simulation world into a world file, like the one that we just opened. In this quick tutorial, we will be using a couple of simulation worlds supplied with the distribution.
The main window and controls
The most part of the GraspIt! main window is occupied by the Inventor viewer, which renders the virtual world. On the right side there is a vertical toolbar: this is the Inventor toolbar which is responsible for camera interaction.
The first two buttons on the Inventor toolbar determine which state the viewer is in.

Interaction mode. This is the only mode in which you can interact with the objects in the simulation world.

Camera mode. This is the only mode in which you can move the camera.
You can also toggle between Interaction mode and Camera mode by
pressing the <ESC> or <ALT> keys, although this seems not to
work on all systems.
The Camera mode
When the viewer is in Camera mode, you can move the virtual camera in the following ways:
- Rotate - Hold down the left mouse button and drag;
- Translate - Hold down
<CTRL>and the left mouse button and drag; alternatively, hold down the middle mouse button and drag; - Zoom - Hold both the left and middle mouse buttons and drag, or rotate the wheel on a wheel mouse.
In addition, the following buttons on the Inventor toolbar are useful:

This automatically moves the camera so that the entire scene fits in the viewer window;

The seek tool allows you to click on an object in the scene. After you click, the camera zooms in on the object, which also becomes the center of rotation.
Take a moment to move the camera around and familiarize yourself with its controls.
The Interaction mode
When the viewer is in Interaction mode, you can interact with the objects in the scene. The type of interaction is determined by the following buttons in the GraspIt! toolbar:

Translate or set joints. Clicking on a body or the base (palm) of a robot causes a box to be drawn around it. This box acts as a translation manipulator. By clicking on the sides of the box and dragging the mouse, the body or robot can be translated in 2 dimensions that are aligned with the face of the box that was clicked. Holding down
<SHIFT>constrains this motion to one axis. If a robot is selected and moved.Clicking on a kinematic chain causes joint draggers to be drawn for each DOF on that chain. You can then use these draggers to move the joints of the robot.

- Rotate. Clicking a body or robot base link brings up a spherical rotation manipulator. Dragging the ball allows rotation of the selected item in three dimensions. By clicking one of the stripes, the body can be rotated about one axis at a time. By dragging the cross hairs, the ball can be re-centered to rotate about a different point. The limitations concerning connected robots applies to rotation as well.

- Select. Clicking a body will select it, and this is indicated
with a wireframe overlay. Holding down
<SHIFT>allows multiple bodies to be selected, or clicking on an already selected link of a robot will select the whole robot. Once a body (or bodies) has been selected, its collision and material properties are shown in the next part of the toolbar. They can then be changed or additional properties can be changed using the menu item described below. After a body is selected, the user may remove the body from the world by pressing<DEL>.
Try to use the TranslateTool tool to flex the fingers of the robot. Note that once a finger touches the object, a contact is marked and no more flexion is allowed. The same behavior applies for moving objects or robots around.
The following buttons in the GraspIt! toolbar apply to the currently selected body (if any):

- Toggle Collisions. There are 3 different ways to use this
property:
- if no body is selected, this button allows collision checking for the entire world to be switched on or off.
- if one or more than two bodies are selected, this button sets the collision checking for those bodies. A body that has collision checking turned off can pass through ANY other body.
- if two bodies are selected, this button allows collision checking between ONLY that pair of bodies to be disabled.

- Material. This sets the material for the selected bodies, which affects the coefficient of friction when contacts arise.
Try to disable collisions for the entire simulation world. Note that now you can move objects or flex fingers freely, even if that results in a collisions. Make sure you move all objects out of collisions before you re-enable collision checking; otherwise, you will not be able to move them around.
You can also create one or more contacts between the hand and the object. Once you have a contact, select one of the bodies in contact (such as the robot link that is touching the flask, or the flask itself) and change its material. Notice how the friction cone that marks the contact changes as well.
Grasp example
Start by loading the simulation world dlr_flask.wld again, to make
sure all the world elements are in their original positions. The use the
menu Grasp->Auto Grasp. This will cause all the
fingers of the robot to flex (more details can be found in the ) until
contact with the flask prevents all further motion. You now have a
grasp.
Use the Grasp->Quality Measures... menu to create a new quality measure that will be used on this grasp. By default, the quality measure dialog that appears will create a new quality measure called New Quality Measure of the Epsilon type using an L1 Grasp Wrench Space. Click Add/Edit, and then click OK. The new quality measure, along with its value, will be displayed in the lower left part of the GraspIt! main window.
You can also create a projection of the Grasp Wrench Space for this grasp. Use the Grasp->Create GWS Projection menu. Then click the three checkboxes marked tx, ty and tz and click OK. GraspIt! will display the space of forces that this grasp can apply without a net torque. Note that if you change the camera in the main GraspIt! viewer, the camera that shows the GWS projection moves as well. The axes of the GWS projection are always aligned with the axes of the main viewer.
Dynamics example
Start by loading the simulation world barrettGlassDyn.wld. Then,
start the dynamics engine by pressing the button on the Dynamics
toolbar. Note that the robot joints move slightly and the glass slowly
rolls on the table. The PD controllers in the robot joints are simply
maintaining the current position against gravity.
Use the Grasp->Auto Grasp menu to close the fingers
of the hand. Note that the hand starts closing, then lifts the glass
into its grasp. After the grasp stabilizes, select the glass and change
its material properties to frictionless. The glass then slips out of
the grasp and ends up rolling off the table. You can pause the dynamics
engine at any time by clicking the pause button in the dynamics toolbar.